Welcome
to DVC SHAPES+ Program
(c) Copyright, David Coultas, 1990 -
1998
Release 1.3 for CADKEY 97
Please note that this Online Manual(Instruction) is still under Construction! But getting better!
Page Last updated on 05/26/00 08:45 AM
This program utility will speed up construction of Sheet metal wire models. It is a menu driven CADL program that works within Cadkey. It will draw all standard Sheet metal hole shapes. (i.e. Circles, Obrounds, Rectangles, Squares, Trapezoids, Single Dees, Double Dees. etc...) The program will draw shapes from a user chosen origin or incrementally from a last drawn shape. It will also do copies, grids and place points on the center of shapes if desired.
Upon startup of DVC SHAPES+ if there are no entities drawn on the screen (No part loaded) then a startup shape menu will appear. You can produce a start up wire model that you can use or alter after placing them on the screen (See page 2 for example patterns). These models are compatible with most unfolding software. All lines and faces end in a closed loop. Only one surface is drawn, so watch out for your material thickness. After your sheet metal model is drawn a prompt is asked to see if you would like to place the shapes origin then the Shapes placement menu will come up.
DVC PRE WIRE SHAPE MENU JUMP TO INDEX
· F1 BOX* Draws a basic rectangular box, flanges all equal, no corner relief and corners share same line.
F2 BX=FLNG Draws basic rectangular box with equal size return flanges (See page 3 for types).
F3 DIF_PAN Draws rectangular pan with flanges and square corner reliefs. Graphical reference display is drawn on screen. Follow the prompts. Flanges can be up, down, different sizes, etc. If value entered is negative than a down flange is drawn. If a zero value is entered then no flange is drawn. Reliefs can be different sizes, or no relief if desired. Return flanges: Negative value draws flange to inside of pan, Positive to outside. Linetypes are chosen for up flanges. For example if you use linetype 3 for O.D. flanges on up bends then down flanges will automatically have line-type 2 lines or vise a versa. If all the primary bends go down then the line type will be opposite of what you chose (except for linetype 1,) All lines can be drawn with line-type 1 if desired, then you can manually change those that you want. A check is done to see if two or more return flanges will interfere with each other. If this is the case then a prompt will ask you how those corners are to be drawn. (See page 3 for examples)
F4 OTHER More Shapes (See page 4 for types) When you pick this one a graphic display is drawn on the screen showing you what types to pick from. Enter a number on keypad corresponding with a desired shape. Remember only one surface is drawn so watch out for material thickness. DIF_PAN can draw all these shapes.
F5 FLANGPAN Box With flanges. See page 2 for type. (Upper right corner)
F6 RECTNGL Do you really need a description here?
F7 DVCSTRNG Using only X and Y values this will draw a string of lines. If you need an incremental distance then you can add that value to x. (Example: x+2.125 can be keyed directly on the prompt line.) 2.125 will be added to the last x value
|
|
|
|
|
|
|
|
|
|
|
|
|
|
|


See page 7 for display of different shapes
DVC SHAPES+ MAIN MENU JUMP TO INDEX
· F1 NEW_ORG Establishes new working origin for shapes
F3 OBROUND Draws obround slots (slots with full radius on ends)
F4 RCT_TRP Draws rectangles or trapezoids. If any side angle other than 0 is keyed in then you will get a trapezoid shape. The length dimension of a trapezoid is tangent to the radius. If no radius is given then the length is to the apex of the intersecting lines.
F6 DD or D Draws double or single D shapes(angle orientation with flat side)
F7 WireSHPS Hat Sections and angles to place on model.
F8 SPECIAL More shapes, User defined shapes, DVC Bend ded., Setup.
F9 DVCPLANE Sets up a construction plane and saves it then waits for a new origin to be selected.
ESC Exits from DVC program
DVC SHAPES+ SPECIAL MENU: JUMP TO INDEX
· F1 5_HOLE* Draws a five hole pattern
F2 BOLTHOL Draws bolt hole patterns
F3 KEYHOLE Draws keyholes
F4 AMFENOL Look on page 7 for examples
F5 RCT_OBR Draws Rectangles/Trapezoids with two holes on either side or with slots (radius or square corners). See examples on page 7.
SUBMENU: F1 WTH/HLS Draws Rects/Traps with two holes.
F2 OB/SLOT Draws Rects/Traps with obround slots.
F3 REC/SLOT Draws Rects/Traps with square slots.
F6 DVCTOOLS DVC String, Bend Deduction and Level checking menus
F7 USR_SHP Used for preparing and placing your own special shapes.
F8 DVCSTRNG for drawing irregular shapes. Using only X and Y values this will draw a string of lines. If you need an incremental distance then you can add that value to x. (Example: x+2.125 can be keyed directly on the prompt line.) 2.125 will be added to the last x value
F9 SETUP Setup to turn on or off material thickness generator. Set levels for points and thickness of shapes.
When you first pick a shape you will first define the parameters of that particular shape. Then a menu will come up and ask how you want to place that shape on the screen.
· F1
NEW_ORG Establishes new origin
(see page 10 Working with CPLANES)
F2 SETUP Shapes setup menu
F3 NEWLOC* Draws the new shape at new location from working origin
F4 INCREM Draw the new shape at distance from last drawn shape
F5 DVCPLANE Sets up a construction plane and saves it then waits for a
new origin to be selected. Usually pick two lines for the plane.
F6 PICTOCHG Pick an entity to set color and level to that entity or hit
<Enter> for a quicker color/level change
After you place that shape or change the construction plane or origin then this menu will come up next:
- F1 NEW_ORG Establishes
new Origin (see page 10 Working with CPLANES)
F2 NEW_SHP Draws new shape dim. at new location from origin
F3 NEWLOC* Draws same shape at new location from origin
F4 INC_SAM Draws same shape at a distance from last shape
F5 INC_DIF Draws new shape size at a distance from last shape
F6 COPIES Makes copies of last drawn shape incrementally
F7 GRID Makes a grid pattern of last drawn shape
F8 PLC_PNT Places a point at center of last shape on level per setup.
F9 DVCPLANE Sets up new construction plane then origin.
F10 BACKUP F10 backs up to main menu.
ESC Returns to the DVC main menu
DVC
Shapes+ Installation
JUMP TO INDEX
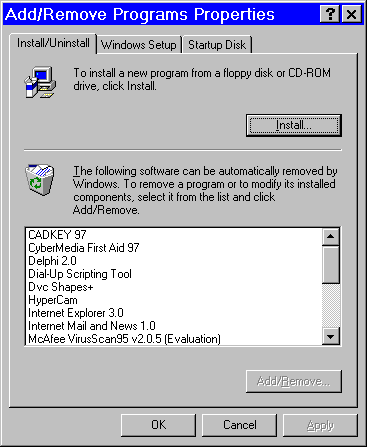
"Start", "Control Panel",
"Add/Remove Programs",
Or do "Start", "Run", type "A:setup"
DVC Shapes+ now has an uninstall.
|
|
|

USER DEFINED SHAPES
JUMP TO INDEX
Under the SPECIALS menu selection is:
F7 USR_SHP (Create and places your own defined shape)
· F1: PLACESHP Places a user defined shape just like a DVC Shape. You must know the name of the shape. "Thickness on" will work with user shapes
F2: DISPSHP Displays selected shape in case you forgot what it looked like. Shape is displayed temporarily in high white relative to currently selected DVC Origin.
F3: PREPSHP Prepares a pre-drawn shape per the rules below as a DVC Shape.
To create a user defined shape you
must follow these rules:
* DRAW SHAPE FLAT TO VIEW ONE.
* SHAPE CAN BE DRAWN IN ANOTHER VIEW SUCH AS 7 OR 8 AS LONG AS A
CONSTRUCTION PLANE IS SET SO THAT IT IS EQUAL TO VIEW 1. CPLANE=1.
* COMBINATIONS OF SHAPES CAN BE DRAWN USING DVCSHAPES AS LONG AS
CPLANE=1. (and shapes are parallel to view 1).
* USE ONLY LINES AND ARCS TO CREATE YOUR SPECIAL SHAPES
* PLACE ONE POINT ONLY SHOWING LOCATION OF CENTER OF (ENTITIES) SHAPE.
* DO NOT PLACE MORE THAN
* AFTER DRAWING YOUR SPECIAL SHAPE THEN SELECT SPECIAL
F7: USR_SHP next select
F3: PREPSHP
SELECT THE ENTITIES OF YOUR SPECIAL SHAPE THEN DECIDE WHETHER YOU
WILL ERASE CHOSEN ENTITIES OR KEEP THEM.
NOTE: Special User Shape files are stored in CDL directory or wherever your CADL files are being directed. Special user shapes filenames have .dat extensions to them. For example: You named a shape as FANOPNG. There would be a fanopng.dat file in your CDL directory. It would also be a good idea to store your special shape as a cadkey ptn file. That way you can always create a Special shape file with PREP A SHAPE in case you destroy or accidently erase your shape files.
F8:
SPECIAL/F9 SETUP
JUMP TO INDEX
The setup screen can be mouse operated or use function keys. For mouse operation just pick the text line you would like to change.
· F1 MAT_THK? Toggles shape thickness generator ON or OFF. When ON every shape placed is generated as an extruded shape with the thickness side and joining lines being set to the thickness set level. Works with user defined shapes
F2 MAT_SET Sets the thickness dimension of extruded shapes. The number can be either a positive or negative value. the direction of the shape thickness is determined by the construction "Z" Axis. This also controls how far away wireshapes are from the plane surface you are working on
F3 MAT_LEV Thickness side and join lines are placed on this level
F4 POINTLEV Points on Center of shapes are set to this level
F5 POINTDRW Toggles points ON or OFF. When ON all shapes drawn will have a center point drawn automatically on point set level.
F6 POINTCOL Sets color of points and leadin geometry that are generated by DVC Shapes
F7 LEAD_SET Toggles ON or OFF of a straight lead in on interior of shapes. Does not work with User defined shapes. This is mainly used by Laser or EDM programmers.
F8
Z ASKING When ON Z depth
will be asked for. (this is from DVCs Origin)
F9 QUIT_SET
Quits setup menu
Here is one procedure of using this program for sheet metal wire models. Draw your model first, or start off with a basic model from DVC SHAPES and modify it if desired, then complete all the DVC SHAPES within each face or plane. There is a DVCDEMO.PRT that was copied to your PRT directory that you can practice placing shapes on also. You can change views, levels, color, or construction planes without leaving DVC SHAPES by using the immediate mode commands or using the mouse in the status menu.
Normally you will work in CONST:3D and COORD:VW. 3D construction and view coordinates.
[2D TRICKS] DVC SHAPES will work in 2D mode, shapes and origin will fall in the plane where the depth is set to, shapes will be oriented to the current construction plane.
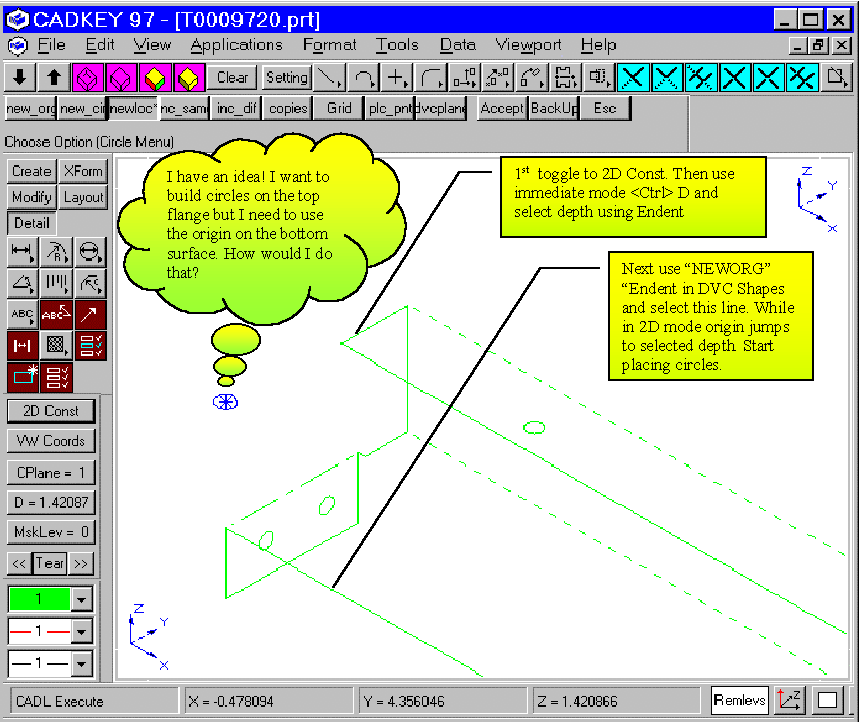
WORKING WITH CPLANES: Construction Planes JUMP TO INDEX
While using DVC SHAPES if you want to set up a construction plane just use the DVCPLANE menu selection. Usually 2 lines is the most common and easiest way to set up a Construction plane for sheet metal models. The first line you pick determines X axis and positive direction. The second line you choose determines positive Y direction. You can use the immediate mode <Atl k> also but if you do you will have to look at the status menu and see what the number is next to CPLANE. If it is a 0 then you also need to save the construction plane. <Alt k> then choose <SAVE>. It is best to use DVCPLANE because this will insure that the construction plane is saved plus you are able to select a NEW_ORG afterward automatically. If you used the immediate mode <Alt k> then you will have to select NEW_ORG in DVC SHAPES menu. NEW_ORG Will not let you pick an origin if CPLANE=0. Anywhere on the model can be selected for an origin. Usually it would be in or parallel to the plane that you are working in.
The Shapes X and Y coordinates that you key in will be oriented in the direction of the Construction Plane Axis. When an angle is prompted for; 0 degrees is in the positive X direction. Positive angles will go CCW direction. Please note that the CCW direction is from positive X to positive Y,. therefore 90 degrees would follow the positive Y direction.
DVC PLANNERS other services include CNC PROGRAMMING for turret punch presses, custom CADL or MACRO programming (i.e. family of parts, repetitious tasks, etc...). 3D Cad design, training and consulting primarily in the sheet metal field. If you have any questions then give us a call at (575)-536-3786. Ask for David Coultas. Thank You.
· Please give us a call or write if you have other shapes that are commonly used that you would like to see added to next revisions. Also if you have a custom shape that you would like to have added to your copy of DVC SHAPES or would like to have any custom CADL application programmed please call for a quote.
DVC Planners Phone support: 505-536-3786 david@dvcplanners.com
FAX: 575-536-3785
DVC Planners
Mimbres, NM 88049
DVC.CDX (The main program) For Cadkey 97 1.02 you can use the Macro Manager and you can still use any immediate mode. (i.e. change color, level, etc.) For Cadkey 97 ver. 1.0 the best way to run this program is thru the Menu selection Applications,CADL Execute, Then Pick DVC.CDX.
DVCSTRNG.CDX is a program used for doing a string of lines from System origin usually used to start off a new oddball shape. This was developed for those Blueprints that already have a flat pattern drawn for you with dimensions from some origin on the print. When entering X end or Y end dimensions if you have an incremental distance that you need to add to the last X or Y all you have to do on the prompt is key your answer like these examples: x+2.125 <Enter> or X+2.125 <Enter>
8 files were placed in your MAC directory:
ONLEVS.CDX Turn ON levels by picking geometry
REMLEVS.CDX Turn OFF levels by picking geometry
DVCBDW.CDX DVC Bend Deduction/Allowance program
CHLVCOLW.CDX Better way to change Color and Levels. Change Color and Level by picking geometry. Or change to New color and level. (I usually bind this CDX file to the "X" key)
COUNT.CDX for counting features by color and level
HOLEFXR.CDX Fixes holes by first keying in new diameter then widowing around holes to be fixes
STEPVW.CDX Step through all your views. <Enter> advances one
view <F10> backs up one view. <ESC> exits programs and remains on
last view looked at. StepVW is also in the
DVCtools menu area in DVC Shapes as <F9>
DVCSTRNG.CDX A program used for doing a string of lines from System origin usually used to start off a new oddball shape. This was developed for those Blueprints that already have a flat pattern drawn for you with dimensions from some origin on the print. When entering X end or Y end dimensions if you have an incremental distance that you need to add to the last X or Y all you have to do on the prompt is key your answer like these examples: x+2.125 <Enter> or X+2.125 <Enter>
You can use the Macro manager in Cadkey97 to bind these CDX files to a key or Toolbar icon.
Home Page | DVC Shapes+ | DVC Inquiry form| E-mail us
![]()
![]() Hints and Tips
Hints and Tips
![]() Installing
Software (Too Easy)
Installing
Software (Too Easy)
![]() Main Menu
Main Menu
![]() Other
Utilities
Other
Utilities
![]() Pre-wireframe
Startup Shapes
Pre-wireframe
Startup Shapes
![]() Setup Menu
Setup Menu
![]() Special Menu
Special Menu
![]() Shapes
Menu (description of typical shapes)
Shapes
Menu (description of typical shapes)
![]() User
Defined Shapes
User
Defined Shapes
![]() Working
with Construction Planes
Working
with Construction Planes